Integration · Shopify
Generate on-model photos for your Shopify catalog
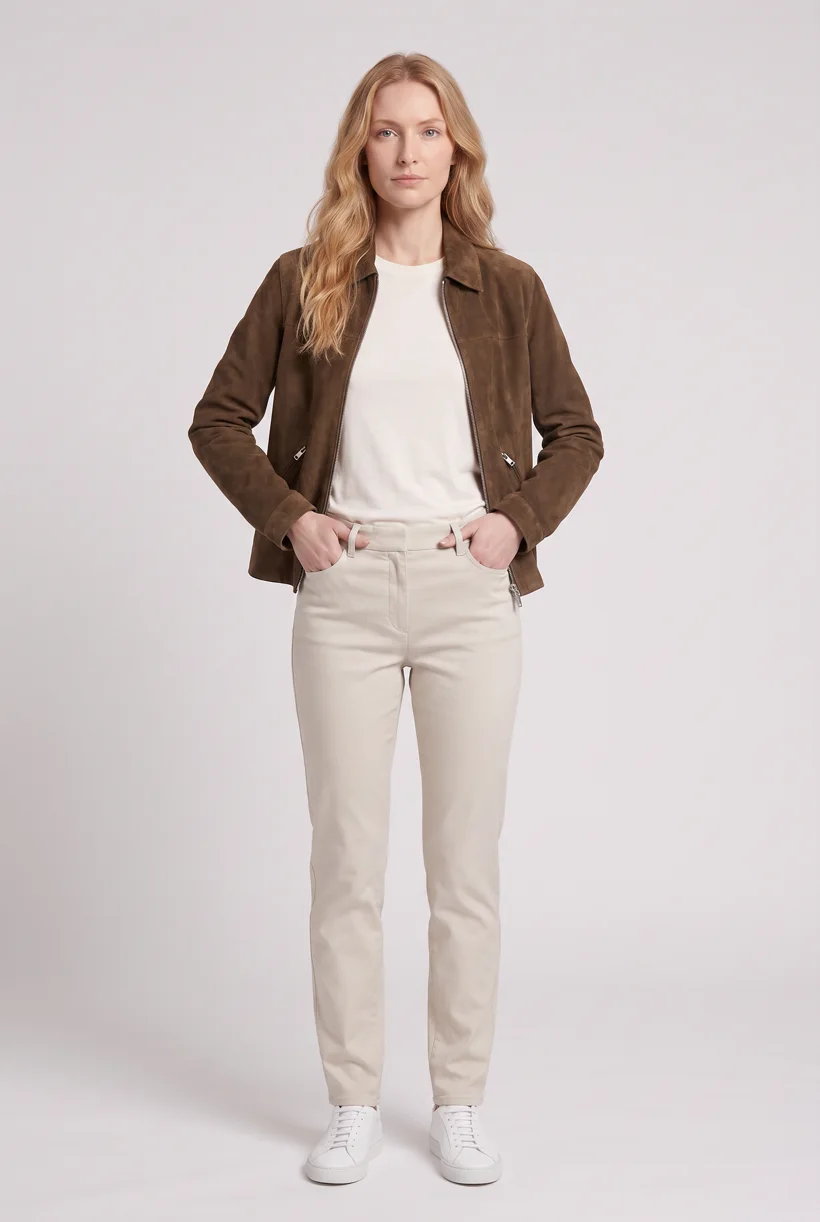
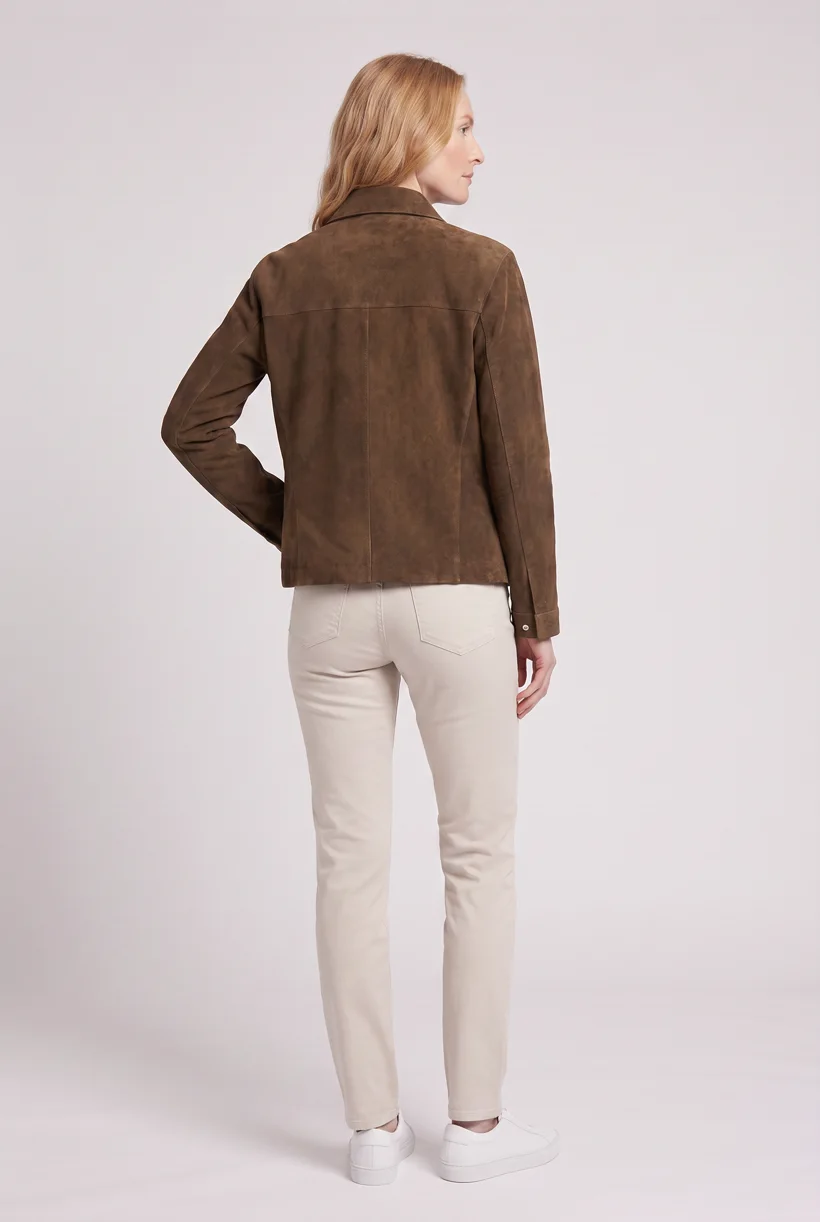
Start with your assistant and the Product page set template. Use your garment photos to create studio views, then add them to the right product.
Use cases
What can you build?
Automate on-model product photos
Build a virtual try-on storefront experience
Assistant workflow
How do you run this from your assistant?
Uwear ran this workflow for one product on a Shopify development store on September 18, 2026, with the Shopify connector for Claude and Uwear MCP in the Code tab. Read the field notes for the results and limits. This is not a preinstalled connection. The chat tab and other assistants were not tested.[11][12][13][57][58]
Shopify plugin for ChatGPT / Shopify connector for Claude / Perplexity
Use Shopify’s merchant connections in ChatGPT, Claude or Perplexity. Claude and ChatGPT document product reads and image updates; Uwear tested the Claude connector in the Code tab. Check each host’s tools and permissions.[11][12][13][57][58]
Public installation docs; store login and access approval required.[11][12][13][57][58]
Dev MCP server / Shopify AI Toolkit
Supply developer docs, schemas and validation. Install the Toolkit in Codex with codex plugin add shopify@openai-curated. Store writes use the separately authenticated Shopify CLI store execute command with --allow-mutations.[8][9]
Local Dev MCP; authenticated CLI execution for store operations.[8][9]
Storefront MCP / Storefront Catalog MCP
Connect Shopify and Uwear
Connect Shopify and Uwear MCP in a supported assistant. Shopify lists ChatGPT, Claude and Perplexity; check both connections in your chosen host. Uwear tested the Claude Code tab. The Shopify AI Toolkit and authenticated CLI offer another coding-assistant route.[8][9][11][12][13][57][58]
Approve the Product page set brief
Ask Uwear MCP to load Product page set for the selected garment photos. Review the art direction and credit estimate before generation. Automatic QA compares results with source photos and retries flagged results when switched on.
Append the generated media
Retrieve the Uwear image URLs. Simple connector actions keep the source file name; use fileCreate through graphql_mutation with filename and alt for readable names. Wait for READY, then attach with fileUpdate. A hosted video needs stagedUploadsCreate and a multipart byte upload, which a coding assistant can send from a shell; its external URL alone will not work.[12][25][26][29][30][58]
Check the product gallery
Read each product back by ID after a write. Check images and alt text with get-product; query product { media } for video. Wait for processing and read back the order after productReorderMedia. Set the intended variant preview and check the storefront before publishing.[25][5][58]
Run it from your assistant
Run this photoshoot from your AI assistant with a Uwear template.
Connect the Uwear MCP server to ChatGPT, Claude, or Codex and ask for the Product page set template. It is a batch workflow that runs once per garment: front, upper-body, and back product-page shots on a white studio background, plus a 360-degree video, from one garment photo. Any Uwear account can load it by name, and the assistant shows a costed brief in credits before generation starts.
Copy this prompt into your assistant
Connect the Shopify plugin for ChatGPT or the Shopify connector for Claude and the Uwear MCP server in this session. Read my tagged Shopify products and keep their product and variant IDs. Load the "Product page set" template for their garment photos on its white studio setup, turn the AI reviewer on, and show me the costed brief in credits before generating. After I approve, use fileCreate through graphql_mutation for readable filenames and alt text, wait for READY, and attach with fileUpdate. Use stagedUploadsCreate and a multipart byte upload for video if this session can send the bytes. Check the clip against the garment photos. Read each product back by ID after a write, query product { media } for video, and verify the gallery before reporting.
What one run does, per garment
Generate the front hero
One full-body front photo of the garment on the template model, in the Basic white photoshoot art direction on the Pure White studio location.
Edit to the upper-body crop
A camera edit that reframes the front result to an upper-body front frame instead of generating a new image, so the crop comes from the same session as the hero.
Edit to the back view
A second camera edit of the front result to a full-body back frame, so the product page gets the back of the garment from the same session.
Render the 360 turn
A 5-second Kling 3 Pro video from the front photo: the model turns a slow, full 360 degrees in place, garment readable throughout.
Outputs per garment
- Full-body front photo, 2K, 2:3
- Upper-body front photo, 2K, 2:3
- Full-body back photo, 2K, 2:3
- 5-second 360-degree video
The setup the template pins
- Template kind
- Batch workflow: runs once per garment row
- System key
- demo_full_pdp_test_white_studio
- Art direction
- Basic white photoshoot (system art direction)
- Location
- Pure White (system studio location)
- Model
- The Uwear system model by default; the assistant can swap in one of your saved models when it proposes the brief
- Image model
- nano-banana-pro, 2K, 2:3
- Video model
- Kling 3 Pro, 5 seconds
- QA
- Optional. With the AI reviewer on, each result is checked against the source product photo and flagged results are retried
- Approval
- The assistant shows a costed brief in credits before anything generates
Pure automation
How does API delivery work?
Send images by public URL. Simple connector actions keep the source file name; for readable names, use fileCreate through graphql_mutation with filename and alt. Wait for fileStatus READY, then attach with fileUpdate. A hosted video cannot be added by its external URL: use stagedUploadsCreate and a multipart byte upload, which a coding assistant can send from a shell. Assign a variant preview after attaching the image.[25][26][29][30][58]
Start from a product event
A service receives Shopify webhooks, imports the garment into Uwear and keeps the product mapping. Deduplicate events and ignore changes caused by your own media delivery.[56]
Run generation without an assistant
Submit Uwear REST API jobs and receive completion webhooks. Or start a published Production Automation after a garment is processed, a tag is added or an outfit is created. These are Uwear workspace triggers.
Platform requirements
What image specifications apply?
| Specification | Requirement or guidance |
|---|---|
| Product image size | Up to 5000 × 5000 px or 25 megapixels; keep the file smaller than 20 MB. These are product-media limits, not theme-upload limits.[35] |
| Recommended composition | 2048 × 2048 px for square product images; use a consistent aspect ratio for featured images. Square is a recommendation, not a requirement.[35] |
| Files upload formats | JPEG, PNG, WEBP, HEIC and GIF. Validate the format through your selected upload path.[36] |
| Gallery and variant views | Up to 250 media items per product, including images, video and 3D media.[4] |
| Variant preview | One assigned image per variant. Keep extra views in the product gallery.[5] |
| Hosted video | MOV, MP4 or WEBM; maximum 1 GB and 10 minutes. The Product page set clip is 5 seconds.[36] |
| Alt text and filename | Use filename and alt when creating the file. Describe the garment and view; filenames can receive a unique suffix.[29] |
Existing options
Which AI image tools are already available?
Documented features from the linked sources. These are not independent quality tests.
Shopify Magic / Sidekick
Built-in background and prompt-based image edits suit simple changes in the file editor. Check feature access in your account.[38]
Botika Connector
Imports Shopify products into a Botika account and sends Botika images back. A fit for teams already using Botika that want a packaged product transfer.[40]
Photoroom AI Listing Assistant
Lists virtual models, backgrounds, bulk editing and Shopify publishing. A fit for product photo cleanup and listing maintenance.[41]
Frequently asked questions
Yes. On September 18, 2026, Uwear executed this route for one product on a Shopify development store with the Shopify connector for Claude and Uwear MCP in the Code tab. Shopify imported generated images by public URL. Simple connector actions kept the source file name; fileCreate through graphql_mutation supplied readable names and alt text, followed by READY checks and fileUpdate to attach the images. Read each product back by ID after a write. Other assistants and the chat tab were not tested.[11][29][30][58]
Yes, with a staged upload. In Uwear’s September 18, 2026 test, fileCreate rejected the external Uwear .mp4 URL with Invalid video url. A coding assistant used stagedUploadsCreate, sent the bytes by multipart POST with curl from a shell, then called fileCreate with resourceUrl, waited for READY and attached the video with fileUpdate. Read product { media } to verify it; get-product lists images only. A chat assistant with a networked code sandbox was not tested.[26][29][30][58]
Shopify recommends 2048 × 2048 px for square photos and consistent featured-image aspect ratios. Square is not mandatory. The Product page set template uses 2:3 photos; check the crop in your theme before publishing.[35]
Uwear uses credits at $0.10 per credit, with model rates on the Models page. Your assistant shows a costed brief before generation. QA is automatic and toggleable: when on, an AI reviewer compares results with source photos and retries flagged results.
Research
Sources and access dates
- [4]Gallery order, upload UI, media counts and plan limits
Accessed 2026-09-07
- [5]One assigned variant image and Plus Combined Listings
Accessed 2026-09-07
- [7]Storefront MCP tools, endpoint split and authentication
Accessed 2026-09-07
- [8]Dev MCP setup and Toolkit capabilities; former `/devmcp` URL redirects here
Accessed 2026-09-18
- [9]Authenticated Admin GraphQL execution and mutation flag
Accessed 2026-09-07
- [11]
- [12]Official merchant plugin, upload-image and product/GraphQL actions
Accessed 2026-09-18
- [13]Merchant sign-in, delegated access and staff permissions
Accessed 2026-09-07
- [17]Merchant-scoped UCP product-discovery tools and endpoint
Accessed 2026-09-07
- [25]End-to-end file/media flow, scopes, readiness, variants and reordering
Accessed 2026-09-07
- [26]Upload targets, parameters and resourceUrl
Accessed 2026-09-07
- [29]Alt, filename, duplicate resolution and source URL rules
Accessed 2026-09-07
- [30]Product references, alt text, shared file updates and removal effects
Accessed 2026-09-07
- [35]Product image dimensions, formats, recommended size and media display
Accessed 2026-09-07
- [36]Files requirements, aspect ratios and filename rules
Accessed 2026-09-07
- [38]Built-in image editing, watermark, pricing and plan wording
Accessed 2026-09-07
- [40]Botika Connector listing, pricing and reviews
Accessed 2026-09-07
- [41]Photoroom listing, capabilities, pricing label and reviews
Accessed 2026-09-07
- [45]Theme extension resources and merchant placement
Accessed 2026-09-07
- [47]Storefront-to-backend proxy and write_app_proxy scope
Accessed 2026-09-07
- [56]Shopify events and integration triggers
Accessed 2026-09-07
- [57]Shopify connections for ChatGPT, Claude and Perplexity
Accessed 2026-09-18
- [58]
Next step
Connect your catalog to Uwear.
Start with an assistant-led test, then build the API delivery your catalog needs.